Intel Core i3 H264 GPU Acceleration using Ubuntu and XBMC
This article outlines the steps that are needed, starting from a clean Ubuntu 10.04 (Lucid), to get DTS 5.1 / Dolby Digital 5.1 through HDMI, and H264 hardware GPU decoding up & running.
It involves the following steps that will be outlined in detail below
- Starting from a clean Ubuntu 10.04 system
- Installing the latest intel-drm-next kernel
- Installing libdrm
- Installing libva
- Installing the latest version of XBMC (needed for libva support)
As the Corei3 CPU (combined with the H55 chipset) platform is hailed as THE htpc platform for 2010, I thought I might give it a try.
When it comes to building an HTPC, your first stop will probably be an Intel Atom / Nvidia Ion combo. They are cheap, well supported (both by the hardware / software vendors, as well as by the community), and you can get things up & running in no time. Thanks to the Nvidia Ion chipset, they’re perfectly capable of decoding 1080p H264 content while maintaining a low power consumption.
When Intel announced their new Clarkdale (desktop CPUs) and Arrandale (notebook CPUs) lineup, the first thing that I noticed was the pricing. Although everybody seemed to be very excited about the integrated GPU and low power consumption, the new Core i5 CPUs were priced relatively high when compared to similar AMD offerings. Even in their own ranks, Intel already had a very interesting quad-core CPU , the core i5 750 that had an excellent performance/price ratio. I doubt that many people want to combine a high-end Clarkdale CPU with a low-end integrated video solution.
According to me, the only true interesting CPU from the Clarkdale line-up was the Core i3 530, currently selling at around 110€. Just like the new Core i5 CPUs, it also features hyperthreading, low power consumption and Intel HD Integrated Graphics, making it an ideal fit for an HTPC build.
Here are some specs regarding the Intel Core i3 530 :
| CPU | Core i3 530 |
| Speed | 2,93 GHz |
| Cores | 2,93 GHz |
| HyperThreading | Yes |
| L2 Cache | 2x 256 kB |
| L3 Cache | 4 MB |
| Memory controller | 4 MB |
| Integrated Graphics Type | Intel HD Graphics |
| Integrated Graphics Speed | 733 Mhz |
| TPD | 73W |
IMHO, the platform is overpriced (compared to the Atom / Ion offering, and even some of the AMD offerings).
Starting from a clean Ubuntu system.
When Ubuntu 10.04 is installed, the graphics drivers for the Core i3 integrated GPU should be installed, and your X environment should be fully functional. You can use the advanced Compiz desktop effects out of the box. The kernel installed on the 10.04 by default is
corei3@corei3-desktop:~$ uname -r
2.6.32-21-generic
Ubuntu will prompt you to update your system, through the update manager. Feel free to do so. On a kernel level, you’ll end up having 2.6.32-24-generic.
With an out-of-the-box Ubuntu 10.04 installation however (even after the updates), I wasn’t able to get sound via HDMI into my receiver working.
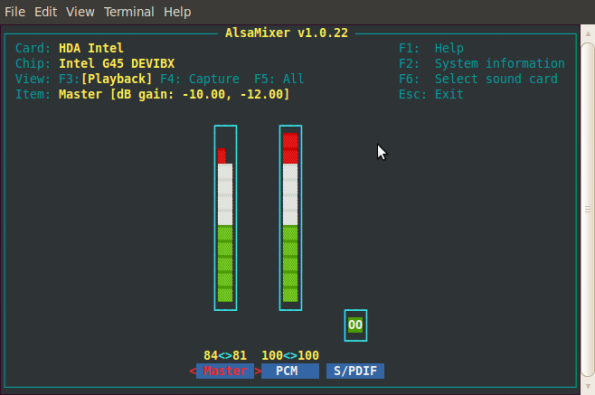
Running alsamixer revealed only 3 audio devices.
Many users have reported stability issues when starting from an out-of-the-box Ubuntu 10.04 system on the Core i3 platform. Therefor, the first thing we’ll be doing is upgrading our Linux Kernel.
Installing a new kernel
In order to fix the audio issue you need to install the latest stable kernel. Kernel version 2.6.33 is the latest stable released kernel at the time of writing that will fix the hdmi audio issue. An overview of the kernels can be found here : http://kernel.ubuntu.com/~kernel-ppa/mainline/ . Although this kernel version will fix the sound issue, if won’t provide us with the GPU acceleration we’ll be needing in a while. According to the Intel 2010Q2 graphics package, we need a 2.6.35-ish kernel.
I’ve downloaded v2.6.36-rc3-maverick from here
You need to download the following files:
- the image package
- the headers package
- the headers ‘all’ package.
The files need to correspond to your architecture (amd64 for x86-64 machines and i386 for 32-bit)
For installing the .deb’s, create a folder somewhere on the file-system, and put the following commands in an install-kernel.sh script (give execute permissions to the install-kernel script, and run it) :
FILES="linux-headers-2.6.36-997_2.6.36-997.201009110905_all.deb \
linux-headers-2.6.36-997-generic_2.6.36-997.201009110905_amd64.deb \
linux-image-2.6.36-997-generic_2.6.36-997.201009110905_amd64.deb"

for f in $FILES
do
wget http://kernel.ubuntu.com/~kernel-ppa/mainline/drm-intel-next/2010-09-11-maverick/$f
done

sudo dpkg -i $FILES
sudo update-grub2
After installing the new kernel, and rebooting your machine, verify that the kernel was succesfully installed (and that you selected the proper kernel version at startup) by exectuting the following command :
corei3@corei3-desktop:~$ uname -r
2.6.36-997-generic
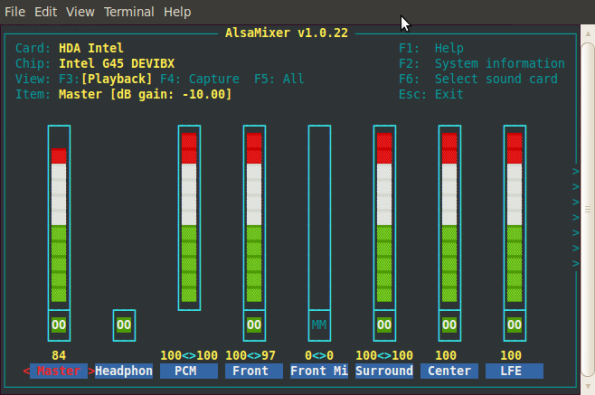
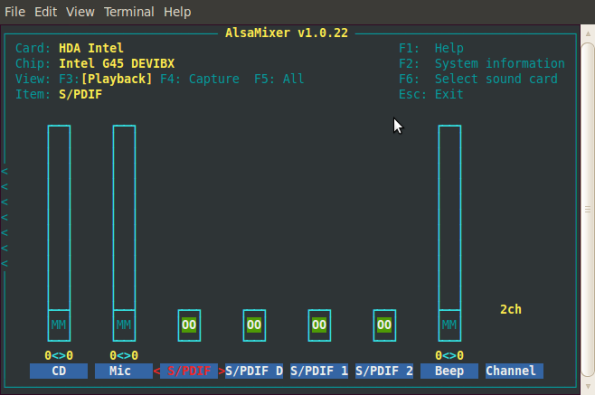
The alsamixer revealed the following audio devices :
Make sure the SPDIF devices are not muted. (Use the cursor keys to selected the SPDIF devices and press M to un-mute them if necessary).
GPU Acceleration for H264 content
Although we have sound up & running right now, we don’t have GPU acceleration in XBMC at this point. The CPU is doing all the heavy lifting for now as you can see in the screenshot below :
Although the Intel Core i3 530 is perfectly capable of decoding H264 content without the help of its GPU, there are a couple of advantages in letting the GPU perform this task :
- less heat produced by the CPU when decoding h264 1080p video content
- less fan noise due to lower CPU temperatures.
- ability to perform other CPU intensive tasks while decoding h264 1080p video content.
Installing libdrm
The next step is to install libdrm.
Libdrm can be downloaded at http://dri.freedesktop.org/libdrm/.
In order to install it, execute the following commands
sudo apt-get build-dep libdrm
wget http://dri.freedesktop.org/libdrm/libdrm-2.4.21.tar.gz
tar -zxpvf libdrm-2.4.21.tar.gz
cd libdrm-2.4.21
./configure
make
sudo make install
Installing libva with Corei3 support
I downloaded the latest libva from the ubuntu site (http://security.ubuntu.com/ubuntu/pool/main//libv/libva/) but that didn’t do much good.
I ended up downloading Libva from http://www.splitted-desktop.com/~gbeauchesne/libva/
Before you’re able to build libva, you’ll need to install the following build dependencies :
sudo apt-get install cdbs libdrm-dev x11proto-xext-dev libxext-dev libxfixes-dev libgl1-mesa-dev automake1.9
wget http://www.splitted-desktop.com/~gbeauchesne/libva/libva_0.31.1-1+sds4.tar.gz
tar -zxpvf libva_0.31.1-1+sds4.tar.gz
cd libva-0.31.1
./configure --enable-i965-driver --prefix=/usr
make
sudo make install
Notice how libva is configured to enable the i965 driver. This is required in order to have h264 hardware acceleration.
This will install the driver correctly.
Another way is create debian packages from the source tree, and install them using the dpkg utility.
wget http://www.splitted-desktop.com/~gbeauchesne/libva/libva_0.31.1-1+sds4.tar.gz
tar -zxpvf libva_0.31.1-1+sds4.tar.gz
cd libva-0.31.1
dpkg-buildpackage -rfakeroot -uc -us
sudo dpkg -i ../libva1_0.31.1-1+sds4_amd64.deb
sudo dpkg -i ../libva-driver-i965_0.31.1-1+sds4_amd64.deb
This will generate the following artifacts :
- libva-dev_0.31.1-1+sds4_amd64.deb
- libva1_0.31.1-1+sds4_amd64.deb
- libva1-dbg_0.31.1-1+sds4_amd64.deb
- libva-driver-i965_0.31.1-1+sds4_amd64.deb
You can install these packages by executing the following command (from the libva folder) :
sudo dpkg -i ../libva*.deb
vainfo is a tool included with libva that you can use to verify the installation of the va library.
corei3@corei3-desktop:~/Downloads/test2/libva-0.31.1$ ./test/vainfo
libva: libva version 0.31.1
libva: va_getDriverName() returns 0
libva: Trying to open /usr/lib/dri/i965_drv_video.so
libva: va_openDriver() returns 0
lt-vainfo: VA API version: 0.31
lt-vainfo: Driver version: i965 Driver 0.1
lt-vainfo: Supported profile and entrypoints
VAProfileMPEG2Simple            :    VAEntrypointVLD
VAProfileMPEG2Main              :    VAEntrypointVLD
VAProfileH264Baseline           :    VAEntrypointVLD
VAProfileH264Main               :    VAEntrypointVLD
VAProfileH264High               :    VAEntrypointVLD
corei3@corei3-desktop:~/Downloads/test2/libva-0.31.1$
Installing XBMC
We’ll be using XBMC as our video player to test both the audio over HDMI as well as the GPU acceleration .
There are several ways and versions to install xbmc.
- Installing the current version from the ppa:team-xbmc repository
- Installing XBMC 10.00~svn33324 from the ppa:team-xbmc-svn/ppa
- Downloading the sources and building XBMC yourself
We’ll be choosing the third option, as the svn build located in the ppa:team-xbmc-svn/ppa repository doesn’t have the VA-API option available in the XBMC config screen (See this bug report for more info).
For completeness however, I’ll be outlining all different ways of installing XBMC.
Installing the current version from the ppa:team-xbmc repository
Execute the following commands to start xbmc :
sudo add-apt-repository ppa:team-xbmc
sudo apt-get update
sudo apt-get install xbmc xbmc-standalone
xbmc &
Installing XBMC 10.00~svn33324 from the ppa:team-xbmc-svn/ppa
sudo add-apt-repository ppa:team-xbmc-svn/ppa
sudo apt-get update
sudo apt-get install xmbc
This will install XBMC 10.00~svn33324
Downloading the sources and building XBMC yourself
You can also download the sources and build it directly. For that, you need to execute the following commands:
sudo apt-get install subversion
cd $HOME
svn checkout http://xbmc.svn.sourceforge.net/svnroot/xbmc/trunk xbmc
This will install subversion (the svn command), and checkout the latests XBMC sources from the trunk, into a folder called xbmc in your home dir.
Now, before we can start building the XBMC source, we need to make sure we have the required build packages installed. If we don’t have the required build packages installed on the Ubuntu system, we’ll get the following error :
checking boost/shared_ptr.hpp presence... no
checking for boost/shared_ptr.hpp... no
configure: error: Could not find a required library. Please see the README for your platform.
There is a README.ubuntu file in the XBMC folder, telling us there are 2 ways to get the build packages. One option is to list them all :
sudo aptitude install subversion make g++ gcc gawk pmount libtool nasm automake cmake gperf unzip bison libsdl-dev libsdl-image1.2-dev libsdl-gfx1.2-dev libsdl-mixer1.2-dev libfribidi-dev liblzo2-dev libfreetype6-dev libsqlite3-dev libogg-dev libasound-dev python-sqlite libglew-dev libcurl3 libcurl4-gnutls-dev x11proto-xinerama-dev libxinerama-dev libxrandr-dev libxrender-dev libmad0-dev libogg-dev libvorbisenc2 libsmbclient-dev libmysqlclient-dev libpcre3-dev libdbus-1-dev libhal-dev libhal-storage-dev libjasper-dev libfontconfig-dev libbz2-dev libboost-dev libfaac-dev libenca-dev libxt-dev libxtst-dev libxmu-dev libpng-dev libjpeg-dev libpulse-dev mesa-utils libcdio-dev libsamplerate-dev libmms-dev libmpeg3-dev libfaad-dev libflac-dev libiso9660-dev libass-dev libssl-dev fp-compiler gdc libwavpack-dev libmpeg2-4-dev libmicrohttpd-dev libmodplug-dev libssh-dev gettext cvs
Another option (something that didn’t work for me) is to add this to your repos http://launchpad.net/~team-xbmc-svn/+archive/ppa and calling the following commands :
sudo apt-get update
sudo apt-get build-dep xbmc
I was unable to execute the command above, so I had to install the build dependencies manually (first option). Apparently, this issue has also been reported by several other users.
Next step is to to run the following commands to start the build and install XBMC :
./bootstrap
./configure
make
sudo make install
Configuring XBMC video settings
Now it’s time to launch XBMC. The second time I tried this tutorial (re-installed ubuntu from scratch), my XBMC user interface was very slow. The movies played fine, but the main XBMC interface was very sluggish. This was fixed ny setting the vsync from 3 to 2 in my guisettings.xml (located in ~/.xbmc/userdata/guisettings.xml)
    <videoscreen>
        <guicalibration></guicalibration>
        <haslcd>false</haslcd>
        <resolution>0</resolution>
        <screen>0</screen>
        <screenmode>WINDOW</screenmode>
        <testpattern></testpattern>
        <vsync>2</vsync>
    </videoscreen>
I don’t know why this worked out-of-the-box the first time I ran it.
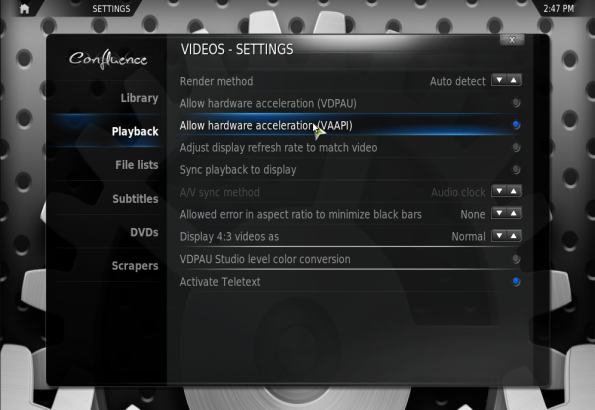
Now, to continue, we need to make sure that VAAPI is enabled in XBMC. (System – Video – Playback)
Configuring XMBC audio settings
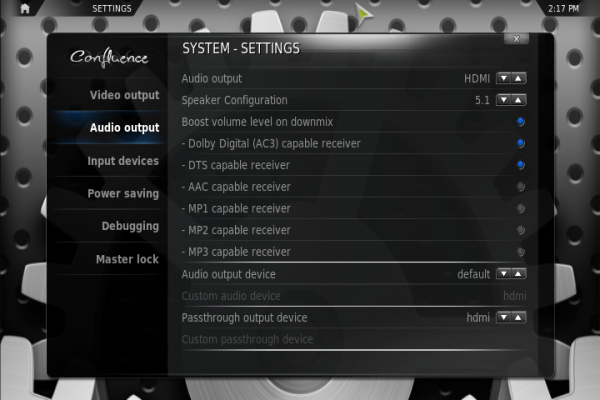
Once this is done, configure your XBMC audio settings like this.
This allows us to get the audio up & running, and have support for DTS 5.1 and Dolby Surround 5.1,
Playing some videos
Now launch a video and press the “o” key to display the stats. The first impressions were pretty awfull. The CPU load was reduced, but we saw a lot of dropped frames, and the image wasn’t watchable due to heavy stuttering.
Apparently, Compiz was to blame here. The Ubuntu Desktop Efforts (System – Preferences – Appearance – Desktop Effects) was having were set to “Extra”. Putting these to none resolved the dropped frames issue, and the video was fluent, with less then 10% CPU utilization.
Installing the pached mplayer
Get the latest mplayer from here http://www.splitted-desktop.com/~gbeauchesne/mplayer-vaapi/
sudo apt-get build-dep mplayer
wget http://www.splitted-desktop.com/~gbeauchesne/mplayer-vaapi/mplayer-vaapi-latest-FULL.tar.bz2
bunzip2 mplayer-vaapi-latest-FULL.tar.bz2
tar -xpvf mplayer-vaapi-latest-FULL.tar
cd mplayer-vaapi-20100713
./checkout-patch-build.sh
cd mplayer-vaapi/
./mplayer -vo vaapi -va vaapi ~/Desktop/hd_thx_amazing_life_lossless.m2ts
When a video is playing, you should see the following output :
corei3@corei3-desktop:~/Downloads/mplayer-vaapi-20100713/mplayer-vaapi$ ./mplayer -vo vaapi -va vaapi /media/120260D90260C379/Video/Kick-Ass4/title00.mkv
MPlayer SVN-r31722-4.4.3 (C) 2000-2010 MPlayer Team
mplayer: could not connect to socket
mplayer: No such file or directory
Failed to open LIRC support. You will not be able to use your remote control.

Playing /media/120260D90260C379/Video/Kick-Ass4/title00.mkv.
libavformat file format detected.
[matroska @ 0x2d5fac0] Estimating duration from bitrate, this may be inaccurate
[lavf] stream 0: video (h264), -vid 0
[lavf] stream 1: audio (dca), -aid 0, -alang eng, HD Lossless
[lavf] stream 2: subtitle (pgssub), -sid 0, -slang nld
VIDEO:  [H264]  1920x1080  0bpp  23.976 fps    0.0 kbps ( 0.0 kbyte/s)
libva: libva version 0.31.1-sds1
libva: va_getDriverName() returns 0
libva: Trying to open /usr/lib/va/drivers/i965_drv_video.so
libva: va_openDriver() returns 0
==========================================================================
Opening video decoder: [ffmpeg] FFmpeg's libavcodec codec family
[VD_FFMPEG] VA API accelerated codec.
Selected video codec: [ffh264] vfm: ffmpeg (FFmpeg H.264)
==========================================================================
==========================================================================
Opening audio decoder: [ffmpeg] FFmpeg/libavcodec audio decoders
AUDIO: 48000 Hz, 2 ch, s16le, 1536.0 kbit/100.00% (ratio: 192000->192000)
Selected audio codec: [ffdca] afm: ffmpeg (FFmpeg DTS)
==========================================================================
[AO OSS] audio_setup: Can't open audio device /dev/dsp: No such file or directory
AO: [alsa] 48000Hz 2ch s16le (2 bytes per sample)
Starting playback...
Unsupported PixelFormat 61
[VD_FFMPEG] Trying pixfmt=1.
Movie-Aspect is 1.78:1 - prescaling to correct movie aspect.
VO: [vaapi] 1920x1080 => 1920x1080 H.264 VA-API Acceleration
[VD_FFMPEG] XVMC-accelerated MPEG-2.
A:  67.9 V:  67.9 A-V:  0.003 ct:  0.001   0/  0 23% 11%  3.5% 12 0

MPlayer interrupted by signal 2 in module: key_events
A:  68.0 V:  68.0 A-V:  0.026 ct:  0.004   0/  0 23% 11%  3.5% 12 0



great job, nice tut but one problem…
set compiz to non does not fit the stuttering problem…what can i do?
If you have the patched mplayer installed, can you try and play the video with vaapi enabled and check if you also have stuttering there ?
If it works fine in mplayer, can you disable vertical blank sync (In XBMC, click on System – System – Video Output – Vertical Blank sync : disabled) and see if it resolves the stuttering.
I’m having this same problem. It works fine in the patched mplayer, but stutters hard in xbmc, even with vertical blank sync disabled. Any more ideas, anyone?
Did some more digging… The stuttering is a problem specific to XBMC that has not yet been resolved by the developers. It’s not even specific to Intel chips, just VAAPI.
http://forum.xbmc.org/showthread.php?p=640264#post644712
hi ddewaele,
hast du zufällig vdr auch kompiliert um XBMC mit PVR-testing zu verwenden?
LG duck
hi ddewaele,
sorry wrong language 🙂
did you also tried to install VDR to use XBMC with pvr-testing ??
if yes, which version did you compiled? did it worked?
LG duck
No worries … google translate came to the rescue … 🙂
Unfortunately I don’t have a TV tuner card here as I’m getting my digital TV through a settopbox from my cable provider.
Great howto!
One can use these packages https://launchpad.net/~n-muench/+archive/vlc/+packages
to skip the steps for building libdrm/libva
Thx !
I’ll checkout the packages as I’m not really a fan of building from the source, especially not on an ubuntu system where everything should just work based on packages.
I don’t think these were available at the time of writing. I did try a couple of libva packages, but could only get it to work with the splitted desktop version and building it myself.
This is the most relevant info I’ve found on this particular subject. Thanks for putting it out there. Unfortunately, I don’t seem to be all the way there. I get thru all the steps fine, vainfo looks good.
But when I try to apat-get install xbmc after adding the SVN repo, it can’t find package, and fails. So I add it via the GUI Software Center, and it works. However, when I run it and check the stats, my CPU cores are all running well into the 20 and 30 % range, and my video settings menus are missing the VAAPI Accel options. I do have the option of using VDPAU, but that does me no good with an Intel chip, eh? Any help or insight is appreciated.
Thx for the compliment… I’m planning a re-write based on the latest ubuntu but haven’t found the time yet…. too busy with day job and other side projects.
Regarding your questions :
I don’t think that XBMC binaries are available with out of the box VAAPI support, it needs to be compiled in. At least that was the case at the time of writing. What exactly was the issue you have with checking out the sources using svn ?
You’re absolutely right about VDPAU, no support for that from Intel nor AMD. (Nvidia only)
The issue I had was this, iirc:
While trying your step above, labeled “Installing XBMC 10.00~svn33324 from the ppa:team-xbmc-svn/ppa”, it said, literally, “can’t find packages.” I ended up going on to the next step and compiling the SVN branch from source, which worked. Maybe it was a dependency/driver clusterbomb. Probably time to format and start clean again. Anyway, XBMC is up and running w VAAPI now, so thanks again!
Next problem is — so far I haven’t been able to play any video using VAAPI in a watchable way. Mad stutter! It’s ok, I don’t expect you to be my personal support rep :). I understand about free time, day job, etc, believe me. I’ll post back if I figure it out, and if in the meantime, anybody knows how to fix, I’m all ears. (btw compiz was removed right after I installed the OS, so it’s not that.
AND —
What video driver should we be using for the i3 — I have i915 (in lsmod), and so was confused by the mention of i965 here.
As far as libva is concerned, you need to enable the i965 driver. (despite the fact that the core i3 is an i915)
Just updated libx264 on my work machine… curious to know if this will somehow magically fix my stuttering problem on the HTPC at home. Though I doubt it, since it appears to be specific to XBMC.
The stuttering is fixed for me by editing the xbmc/cores/dvdplayer/DVDCodecs/Video/VAAPI.cpp file and change the line with “m_refs + 1 + 1” to “return EnsureSurfaces(avctx, m_refs + 3);”
Just checkout my updated guide here: http://forum.xbmc.org/showthread.php?t=86581
Thanks for that! I had been following that thread also, and finally got around to recompiling yesterday (was using stable ubuntu pkg in the meantime). VAAPI working for me now too. Now if I can only get rid of this screen tearing issue :). Will try mucking around with xorg.conf.
Also getting audio sync issues now as well — not on all videos, and not right away. Restarting seems to fix. Probably just a matter of getting the settings right.
I did everything and my vainfo is the same u posted. but when trying yo play through DVDPlayer I get only green screen and mplayer shows Error opening/initializing the selected video_out (-vo) device.
mediacenter@mediacenter-desktop:~/mplayer-vaapi-20100713/mplayer-vaapi$ vainfo
libva: libva version 0.31.1
libva: va_getDriverName() returns 0
libva: Trying to open /usr/lib/dri/i965_drv_video.so
libva: va_openDriver() returns 0
vainfo: VA API version: 0.31
vainfo: Driver version: i965 Driver 0.1
vainfo: Supported profile and entrypoints
VAProfileMPEG2Simple : VAEntrypointVLD
VAProfileMPEG2Main : VAEntrypointVLD
VAProfileH264Baseline : VAEntrypointVLD
VAProfileH264Main : VAEntrypointVLD
VAProfileH264High : VAEntrypointVLD
mediacenter@mediacenter-desktop:~/mplayer-vaapi-20100713/mplayer-vaapi$
mediacenter@mediacenter-desktop:~/mplayer-vaapi-20100713/mplayer-vaapi$ ./mplayer -vo vaapi -va vaapi /media/Storage/Movies/killa.sampla.x264.mkv vainfo
MPlayer SVN-r31722-4.4.3 (C) 2000-2010 MPlayer Team
mplayer: could not open config files /home/mediacenter/.lircrc and /etc/lirc//lirc/lircrc
mplayer: No such file or directory
Failed to read LIRC config file ~/.lircrc.
Playing /media/Storage/Movies/killa.sampla.x264.mkv.
libavformat file format detected.
[matroska @ 0x9bccc60] Estimating duration from bitrate, this may be inaccurate
[lavf] stream 0: video (h264), -vid 0
[lavf] stream 1: audio (ac3), -aid 0
VIDEO: [H264] 1920×1080 0bpp 47.917 fps 0.0 kbps ( 0.0 kbyte/s)
Clip info:
title: Avidemux
Error opening/initializing the selected video_out (-vo) device.
==========================================================================
Opening audio decoder: [ffmpeg] FFmpeg/libavcodec audio decoders
AUDIO: 48000 Hz, 2 ch, s16le, 448.0 kbit/29.17% (ratio: 56000->192000)
Selected audio codec: [ffac3] afm: ffmpeg (FFmpeg AC-3)
==========================================================================
AO: [oss] 48000Hz 2ch s16le (2 bytes per sample)
Video: no video
Starting playback…
A: 9.7 (09.6) of 23.0 (23.0) 1.7%
Hello
I’m totally new to Linux, and have somehow been able to install Ubuntu 10.04, makemkv and Boxee on my core i3 machine. I have the exact same problem as here. No HDMI audio out!
Can someone help a noob how to make a script as the one stated in this how-to? – i don’t know how to do it. Yes, i’m that noob.
Additionally, how do i add my two other harddrives? – i want to use all three, but i can only see one. They need to be partioned and a volume has to be assigned.
Hi All
Got a .sh file up and running, but it seems to do not much. I’ve tried to install it on a distro i obtained from linuxcnc. It requires the use of an RTAI kernel, which is old and does not support HDMI AUDIO.
My system is 32 bit – i’m pretty sure – and i’ve changed the script to download the .deb’s (i386) from . I get something like this when checking kernel as stated in this guide:
2.6.32 RTAI
What am i doing wrong? – I have tried installing the one i downloaded from the official website, but out of the box, it cannot even reconize the USB-periferals like mouse and keyboard..
Anyone here who can help me get going? – i so want hdmi audio out when playing movies..